Celestial Alignments: Deciphering the Enigmatic Golden Dial in Crimson Desert
The world of Crimson Desert unfolds with intricate puzzles set against the backdrop of treacherous landscapes and mysterious ruins. Players quickly discover that each challenge demands careful observation and precise actions. In one particularly enigmatic location, an ancient ruin known as Trembling Woods offers a puzzle wrapped in both natural danger and cryptic mechanics. The environment challenges travelers with hidden perils, while the puzzle itself calls for a harmonious alignment of celestial symbols through clever manipulation of several dial layers. As adventurers traverse rocky cliffs and navigate hostilities around every corner, they are drawn into a test of wit and agility that blends exploration with innovative gameplay features.
The Challenge of the Ruins' Setting
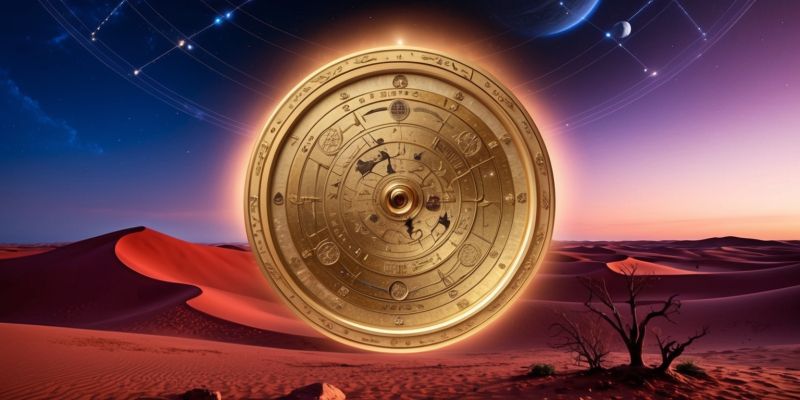
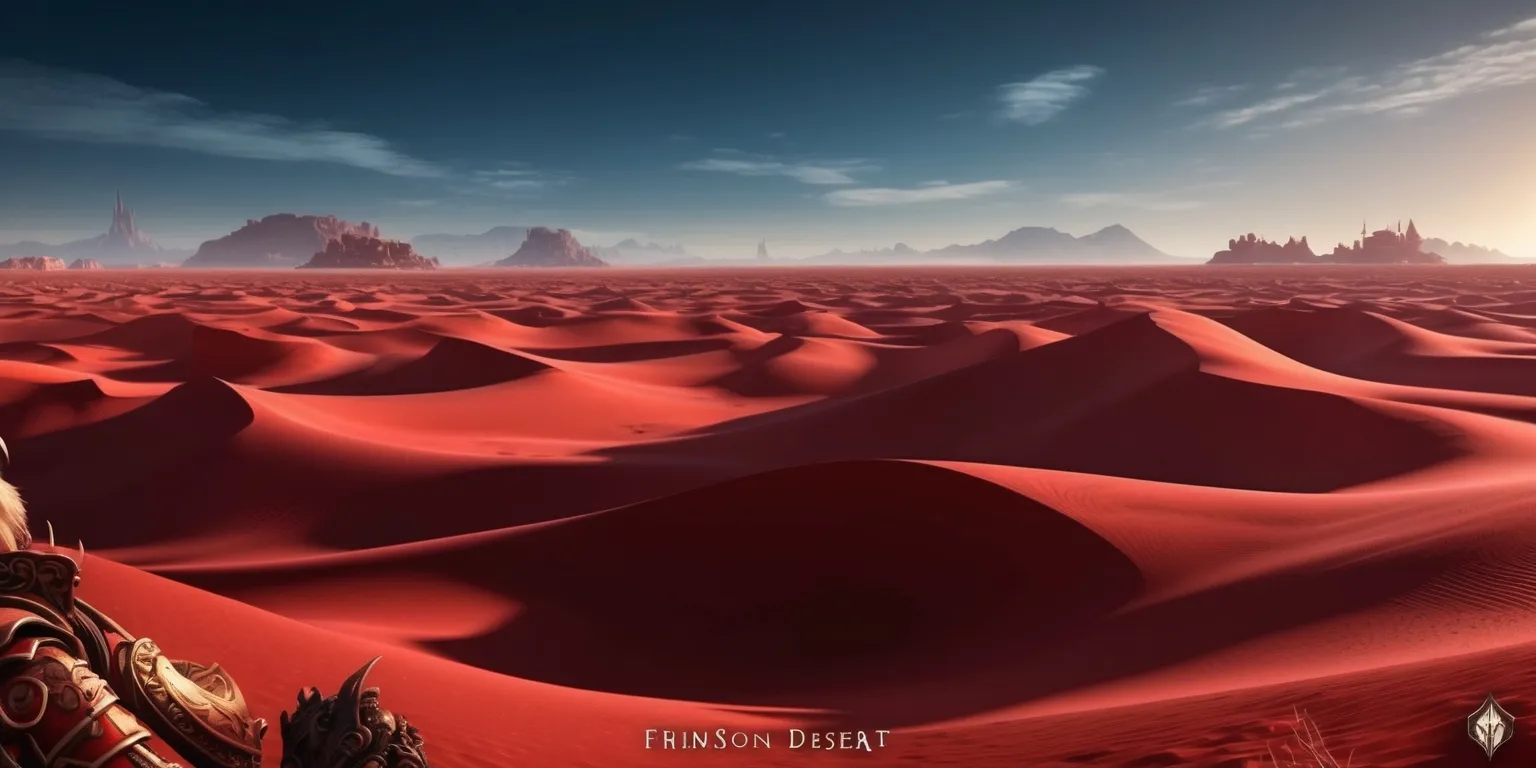
The ruins of Trembling Woods in Crimson Desert present a captivating yet hazardous locale that tests the mettle of every explorer. The area is dotted with precarious rocky cliffs, dense foliage, and unpredictable natural traps that demand careful navigation. Hidden among these rugged environmental features is a large, intricately designed golden dial adorned with celestial symbols, an enigmatic centerpiece that captures the curiosity of players. The puzzle’s placement among the ruins also means that adventurers must remain alert, as natural hazards and hostile creatures may complicate every step of the approach. The setting is both aesthetically awe-inspiring and strategically challenging, offering a blend of beauty and danger that perfectly encapsulates the spirit of ancient Pywel.
Mastering the Golden Dial's Mechanisms
The golden dial, with its multiple rotating layers and celestial insignia, encapsulates the intricate design philosophy behind Crimson Desert puzzles. At its heart, the dial is a multi-layered mechanism that requires the coordination of three independent pedestals, each controlling a specific rotational component. The symbols engraved upon the dial evoke ancient lore and cryptic tales of celestial events, drawing players into the narrative and mechanics simultaneously. As one interacts with the dial, it becomes apparent that no random turns are permitted; every movement must correspond with a thoughtful observation of the hieroglyphic patterns. The challenge of aligning the layers not only tests the player’s logical processing but also emphasizes the importance of patience, strategy, and effective motor skills during gameplay.
Deciphering the Celestial Symbols
At the heart of the enigma resides the array of celestial symbols dominating the golden dial. These symbols—the radiant sun, the slender crescent, and the enigmatic representation of a solar eclipse—go beyond mere decoration, serving as essential components of solving the puzzle. Each symbol interacts with the dial’s layered structure in a way that requires the player to carefully match outlines and shapes to their corresponding forms. The alignment of these celestial icons is orchestrated through a systematic rotation: aligning one configuration prompts a ripple effect across the entire device. The ancient design hints at astronomical phenomena and mystical cycles, inviting players to consider both myth and mechanism as they experiment with subtle rotations and deliberate adjustments within the puzzle’s complex, interlocking parts.
Interplay of the Pedestals and Their Effects
The puzzle is ingeniously engineered with three distinct pedestals that play a critical role in manipulating the golden dial. Each pedestal controls a separate layer and imparts a unique effect on the overall configuration. The two upper layers, primarily composed of metallic outlines, are subtly shifted by the actions taken on the left and middle pedestals. In contrast, the bottom layer, rich with intricate symbols, responds directly to the rightmost pedestal. As players interact with these control points, they must consider the interdependent nature of each movement; a shift in one pedestal can alter the alignment on another layer. This interplay demands foresight and A structured method designed to uncover the hidden patterns that will eventually unlock the puzzle’s deeper secrets.
Operations with the Right-Side Control
The rightmost pedestal holds particular significance as it governs the alignment of the symbol-laden bottom layer. When activating this control, players are tasked with aligning the sun symbol precisely within a fixed framework. By rotating the pedestal, the solar icon is guided into a predetermined position, setting the stage for the subsequent maneuvers that will affect the entire dial. The operation is delicate, requiring both accuracy and timely execution as misalignment may disrupt the delicate interrelations among the symbols. The right-side control thereby symbolizes the first step in a sequence that interlocks the cosmic imagery with the mechanical functions of the puzzle. This calculated manipulation is essential, forging a connection between the ancient lore and modern gameplay mechanics.
Managing the Middle Pedestal Precision
The middle pedestal is tasked with adjusting one of the metallic layers of the dial, a move that bridges the celestial symbols and the underlying mechanical structure. This control changes the position of a large metal outline distinguished by a unique marker, which must be precisely arranged to encapsulate the sun symbol once the right control “has been initiated. It signifies a” task that requires both fine motor skills and a keen sense of spatial awareness, as any slight error in rotation can lead to an unsynchronized configuration. The precision demanded by this step is not merely technical; it is woven into the narrative of discovery. As players perfect their manipulation of the middle pedestal, they experience a gradual unveiling of the puzzle’s thematic coherence and operational ingenuity.
Engaging the Left Pedestal with Skill
The left pedestal presents a unique challenge compared to its counterparts because it lacks a readily accessible handle for direct manipulation. Instead, players must utilize a specialized in-game ability to engage with this control. With precise timing and skillful execution, the ability triggers a simulated interaction where the player plunges their weapon into the lever mechanism, thereby initiating a subtle rotation of the metallic layer under its command. This inventive control method not only enriches the tactile experience of the puzzle but also underscores the varied mechanics that Crimson Desert employs to captivate its audience. Mastery over the left pedestal becomes a measure of both physical dexterity and mental acuity, blending unconventional gameplay with thematic storytelling.
Unlocking the Consequential Blue Podium
Once the symbols and metallic outlines across the dial are perfectly aligned through coordinated pedestal movements, the puzzle finally reveals its hidden mystery: a glowing blue podium. This pedestal is ingeniously hidden in a secluded sub-chamber that becomes accessible after the complex series of rotations. The unlocking of this radiant structure serves as a symbolic reward, linking the efforts of puzzle solving with tangible in-game benefits. Access to the podium requires players to navigate a brief aquatic segment, integrating an element of environmental exploration with the puzzle mechanics. The unveiling of the blue podium is a satisfying payoff that rewards precision and persistence, inviting players deeper into the lore of Pywel and offering a moment of triumph amid the multifaceted challenges of Crimson Desert.
Exploring the Surrounding Pywel Landscape
The Trembling Woods Ruins are set in a larger, intricately crafted world where every landscape is filled with hidden details and persuasive storytelling. Located southeast of Hernand City and north of the towering Steel Mountains, the ruins are conveniently nestled between familiar landmarks like The Ironwood and the Willow River. This strategic positioning on the map guarantees that players remain continuously immersed in their surroundings, balancing the excitement of discovery with calculated caution as they approach precarious cliffs and rocky terrain. The multifaceted design of the landscape encourages players to explore extensively, rewarding those who master the art of navigation and observation with glimpses into the region’s rich history and sprawling natural beauty. The realm of Pywel is as much a puzzle as its ancient ruins.
The Significance of Puzzle Solutions and Rewards
The intricate puzzle of the Trembling Woods Ruins goes beyond mere mechanics, representing a convergence between mythology, skill, and strategy that defines Crimson Desert. The rewards for solving such complex puzzles are not solely material but also enrich the storyline and offer players advanced insights into the game’s lore. In this instance, the successful arrangement of the dial’s layers leads directly to the revelation of a coveted item—an Abyss Cresset—which stands as a testament to the player’s perseverance. Every successful interaction with the puzzle’s mechanisms reinforces the depth of the environment and the layered storytelling that underlies the desert's ancient mysteries. This delicate balance of risk and reward serves to deepen the immersion and continually challenges the player’s intellect in diverse ways.


